Convert a Photo into Pixel Art
Turn a photo into pixel art with readable shapes. Compare pixel sizes, fixed palettes, and ordered dithering using a downloadable photo and real examples.

To convert a photo into pixel art, choose a cell size that keeps the subject readable, select a fixed palette, and add dithering only where you want more texture. The Pixel Art effect combines all three choices. You can export the result from the free browser converter.
Open Pixel Art, then upload the practice photo below. The link selects the effect at its defaults; set the recipe values yourself.
Start with a recognizable silhouette
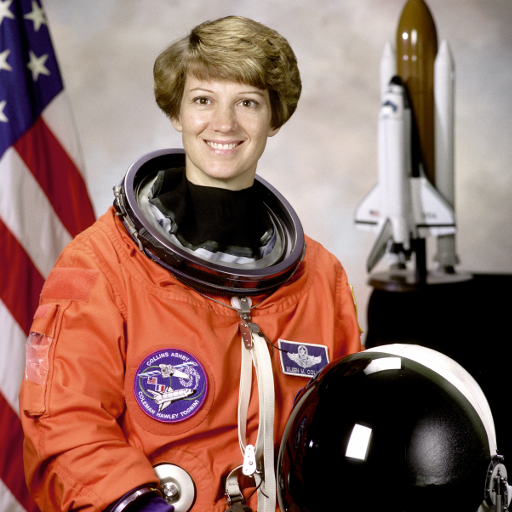
A clear face, bright foreground, and separated background are easier to simplify than a crowded scene. This example uses a 512 × 512 photograph. Pixel size is measured against your output dimensions, so the same number will look finer on a larger image.
Download the practice photo PNG
. Keep its original dimensions, centered at 100% scale with no rotation. Leave playback paused and the effect’s animation off for these still comparisons.

Source — look at the eyes, mouth, and edge of the orange suit as you change the controls.
Choose pixel size before texture
Open Pixel Art in Active FX. Set Pixel size to 4, Palette to Retro 16, Sampling to Center, Dithering to 0%, and Mix to 100%. At this size, the image has 128 cells across. The large color areas simplify while the face still has room for small features.
Now set Pixel size to 16. Only 32 cells fit across this photo. That stronger abstraction can suit a small graphic, but the eyes and mouth have fewer cells to describe them. Increasing dithering cannot recover features that were lost during sampling; reduce the cell size first.

Choose Center or Smoothed sampling
Center takes one exact source pixel near the middle of each cell. It keeps sharp local contrasts, but a small highlight or dark detail can determine an entire cell. Smoothed combines nine evenly spaced samples from the cell before choosing a palette color. It reduces fine detail and can make larger color regions more consistent. It does not average every pixel in the cell.
Set Pixel size to 8, Palette to Retro 16, Dithering to 0%, and Mix to 100%. Switch only Sampling to compare these outputs:


Compare the face, hair, and background details at the same viewing size. Neither mode restores features smaller than a cell. Transparent pixels contribute by their opacity, so hidden colors do not stain a smoothed edge. With Original Colors and Pixel size 1, both modes preserve the input. Center remains the default, including for saved projects created before this option was added.
Return Sampling to Center for the remaining recipes below.
Compare palettes at the same cell size
Return Pixel size to 4 and select Color 32. Its extra colors give the picture more choices for shadows and skin tones. Retro 16 produces stronger simplification; neither preset extracts colors from your photo.

Color 32, Pixel size 4, no dithering. Change only the palette to judge its contribution.
Monochrome has two colors, Green 4 has four green tones, and Original Colors keeps the sampled photo colors. Use the Pixel Art guide for every control. For independent color mapping with editable colors, explore Palette Map.
Introduce ordered dithering
Switch back to Retro 16 and set Dithering to 65%. Dithering alternates nearby palette colors in a repeating pattern. It suggests more shades without adding colors to the palette. On a face, the texture is a stylistic choice: compare with zero before deciding whether it helps.

The pattern follows the pixel cells. It stays still when playback time changes unless you animate a parameter. With Original Colors selected, dithering has no effect because palette mapping is bypassed.
Export and judge the intended size
Keep Mix at 100% if the result should contain only palette colors. Lower Mix blends the photo back in. Use the existing export controls to save a PNG; JPEG compression can alter colors and edges. Keep the original dimensions for the same framing as these examples.
The converter does not reconstruct hand-drawn sprites or provide a dedicated sprite-resolution export. Inspect your downloaded image at the size you intend to share. If the face becomes hard to read, try smaller cells before adding more texture.
For a further treatment, place Pixel Outline, Pixel Tiles, or Pixel Relief after Pixel Art with matching Pixel size values. Tiles adds transparent gaps; Outline and Relief may introduce additional colors.
Next, compare pixelation with palette reduction, or try the recipe on your own photo. The browser supports one image layer and free export. Artfkt for Mac adds all collections and multiple layers.
How these examples were made
These are real outputs from the Pixel Art effect, rendered at the source dimensions with the settings shown, no shared animation, and a fixed time of zero. The downloadable source is a public-domain photograph; it is not AI-generated. The tutorial was prepared with AI assistance and checked against the implemented controls and rendered examples. Different photos need different choices of cell size and palette.
Make something unexpected
Keep exploring in Artfkt.
Bring all collections and multiple image layers together in one Mac studio. Build a look, shape its motion, and save your next starting point.